
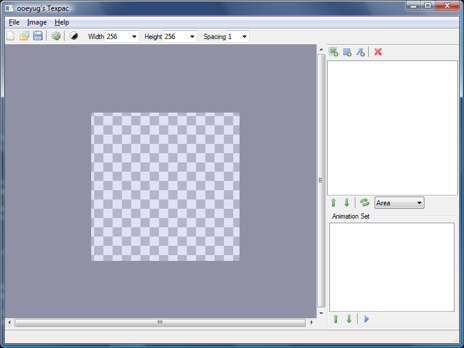
The main checker board box is your texture that you will be creating. Over to the right is the listbox where your tiles will be listed and below that is where any sets you create will be listed. A set is just one parent tile with ordered list of child tiles. Basically a Set is just a way to allow the parent index to start at 0 in your code. Set are primarily used to create animations or fonts.
Let look at some of these toolbars...

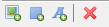
- New - Clear and create a new document.
- Open Project - Open a project that you have previously saved.
- Save Project - Save the current project for later.
- Export Project - Create a texture, yourfilename.png and export the tile locations to the file yourfilename.pac.
- Set Background - Change the background from checkerboard to black. the texture will still be saved as transparent but switching to black will allow you to see those white images and fonts better.
 Make sure to check the tile list box for any tiles marked with a red dot. That indicates that the tile is currently not placed in the texture for lack of room.
There are a few older cards that like textures to only be square. Basically all cards can now deal with textures of 512x512 or greater in size, my research seems to show that only the old voodoo cards had a 245x256
limitation. So you should feel free to create textures at 512x512. You can enter sizes manually instead of using the dropdown, that's very useful for image strips when making toolbar gfx.
Make sure to check the tile list box for any tiles marked with a red dot. That indicates that the tile is currently not placed in the texture for lack of room.
There are a few older cards that like textures to only be square. Basically all cards can now deal with textures of 512x512 or greater in size, my research seems to show that only the old voodoo cards had a 245x256
limitation. So you should feel free to create textures at 512x512. You can enter sizes manually instead of using the dropdown, that's very useful for image strips when making toolbar gfx.
- Width - This allows you to change the width of the texture.
- Height - This is for the Height of the texture.
- Spacing - This defaults to one put when making an image strip make sure to set this to 0.
- Add Image - Add one or more (the requestor allows multiple selections) images
- Add Spacer - Add a spacer rectangle of a given size. This is most often used when creating an image strip for MaxGUI
- Add Font - Add all the tiles that make up a font. Tiles will be made for ascii characters 32-126. These tiles will be brought in as a set with the parent being ascii 32 (space). If you're using dmaz.pacimage drawtext then make sure you leave all the font tiles, don't remove any.

- Move Up - Move a tile up in the list. This does not affect it's location in a set.
- Move Down - Move a tile down in the list.
- Sort - Sort the tiles according to the drop down at the right.
 Sets are useful for finding a series of tiles when coding. I use this for fonts and animations in my programs which use dmaz.pacimage.
You define a set by clicking on what will be the root or parent of the set and then right clicking on the next frame and selecting "Attach"
Sets are useful for finding a series of tiles when coding. I use this for fonts and animations in my programs which use dmaz.pacimage.
You define a set by clicking on what will be the root or parent of the set and then right clicking on the next frame and selecting "Attach"
- Move Frame Up - Move the selected frame up in the set/animation
- Move Frame Down - Move the selected frame down.
- Play Animation - Not in yet but this will allow you to see a defined set animated.
